Architectural Photography - At Night - by Mike Busby Photography
Architectural Photography – at Night
Learning Architectural Photography at night is like anything else, it takes time and practice, but it helps when someone shows you the way. Night photography is advanced photography, and it’s somewhat unique because the regular rules of the road become “kind of sort of” guidelines. Photographers have to deal with expanded dynamic ranges, they operate under the persistent myth of shooting for the highlights, and they have to shoot for post – the images on our camera screens will not tell us if we have a good shot or not. In other words, we have to plan for conditions favorable to the shoot, we have to determine our own set of exposure rules, and we have to use a little faith in something other than our eyes when evaluating shots in the field.
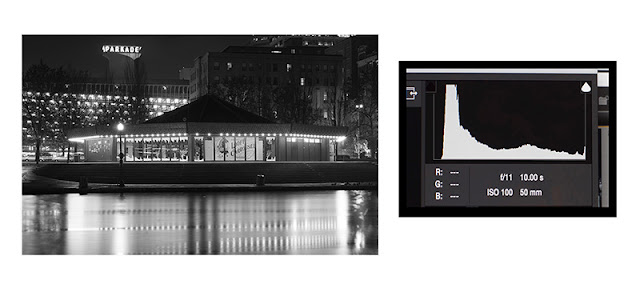
The first hurdle is to create favorable conditions to shoot, and there are two excellent ways to do this. The first is to shoot during the blue hour or Civil Twilight. It occurs about 20 minutes after sunset and lasts anywhere from 40 minutes to an hour. Enough ambient light is present to record the details in the shadows. Another favorable environment is when there are low clouds over a brightly lit city. Reflections from the sky act as fill lights and provide details in the dark shadows. Practically speaking, our cameras can pick up about 7 stops of difference in light. However, dark night city shots may have up to 13 or 15 stops of difference, and that’s too much for our cameras to capture. Shooting in favorable conditions reduces the difference to stops down to about 9, and it enables the camera to get a grasp on the scene. Image 1 will be our final image, and it was shot on a winter’s night with low clouds and reflective city light.
 |
| Image 1 - Carousel |
The second hurdle is overcoming the myth that we should shoot for the highlights. Many of us know that information is lost if we overexpose an image, so the highlights become the priority and we expose for them. However, we lose large amounts of information in the shadows if we follow this guideline at night. What we want to do is overexpose our image under favorable conditions. This will bring out the details in the darks, and it will blow out some information in the highlights. However, those highlights can be recovered in post.
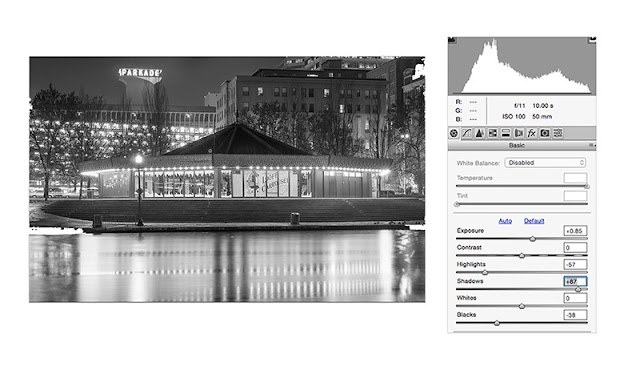
The third hurdle mirrors the second. A good capture may or may not look good on the camera screen. We cannot trust our eyes. As such, we need to turn to the histogram to evaluate the quality of our capture. While usage of the histogram is its own article, we can show what a good capture looks like.
 |
| Image 2 - Spokane Carousel |
Image 2 does not particularly good, but the histogram is showing a good capture. The histogram is just a vertical bar chart that tells you where tonal information is collected. Information on the darks is shown to the left, information on the mid tones are in the middle, and information on the highlights are found on the far right. The critical area is the far left side. This chart slopes up from the left, and that means we captured information in the shadows. Had the chart been flush to the left, as it would have been if we shot a “normal” exposure, then the information in the shadows would have been lost. The far right suggests the highlights are slightly blown out, but it’s not a problem, they will be recovered in post. When you are shooting architecture at night, shoot so that histogram starts to form a little to the right of the far left side.
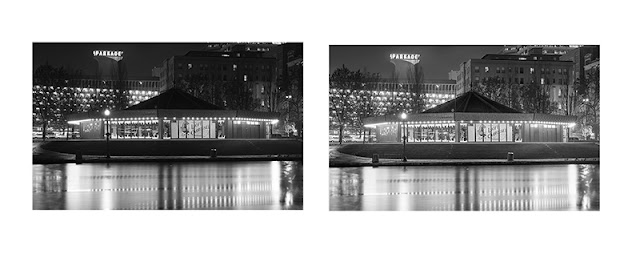
Capturing and developing a good night shot is one part good exposure and one part post-processing. It is a bit of an art, but the following has worked well for me. Import the image into Camera Raw or LightRoom and use the Exposure, Shadows, and Highlight sliders to balance the image like example 3.
 |
| Image 3 - Spokane Carousel |
Balancing is more of an art than a science. Exposure was increased a touch, and then the shadows were raised significantly. It is the lifting of the shadows that brings detail and life into the shot. Finally, the highlight slider was brought down and the blown out whites were recovered. The blacks were lowered a touch as well.
 |
| Image 4 |
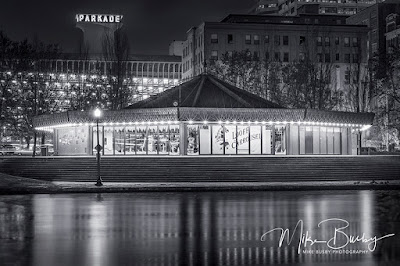
The intent at this point is to balance the image for more post. It is just a good starting point. However, we can see how the image is coming to life through the details and shadows and the energy coming from the bright lights. Again, this is more of an art than a science, but increasing exposure a touch, cranking up the shadows, and then lowering the highlights is the process that consistently works well.
 |
| Image 5 |
As this is an architectural shot, care was given to ensure a level background and straight vertical lines. Additional post includes lifting the shadows a touch more on the roof, adding a dark vignette around the carousel, and removing distractions. Distractions included lights in the background buildings, a few minor reflections in the water, removal of the trashcans, and the removal of a couple of street lights. Silver toning was also used in this image.
Photographing at night is rrelaxing because you tend to be out when other people are not and it’s quite. Further, clients aren’t necessarily aware of how dramatic these shots can be, and they are excited to see them.
To summarize, shooting at night is advanced photography and it can be difficult to master. However, if we plan for favorable conditions, if we’re willing to break from convention by overexposing, and if we realize we’re shooting for post rather than the back of the camera screen, then we are well on our way to creating dramatic and rewarding images.
Mike Busby
Mike Busby Photography
Busbywc@gmail.com
(509) 995-2954
Comments
Post a Comment